Forum menu
+2200Lm - got to be worth it - just for drying the winter trails 🙂
Trout, if you have a spare kit I would be interested as it looks an interesting project. Drop me an email if you do, my address is in my profile.
It gets warm quite quickly, hope cutting it down to 50mm not gong to cause a problem, time will tell I suppose.
As mentioned above, i'd be happy to pay for a kit if you decide to sell them as a kit. Was gutted i missed teh boat first time round. Email is in profile.
If it gets warm quickly that is a good sign as it means the heat transfer is working well .
It can go up to ouch before you need to panic .
but on a ride even a little moving air will keep it cool
just need to remember to dim it when stopped .
I have got more leds coming in this week and have plenty of Reflectors
had a work out and was a few quid out of pocket in the final tally but not worried .
for the same kit I supplied the others and if Steven is happy to supply the other bits the price posted will be £20 as have run out of offcuts of the Aluminium and will have to buy some more
if you want one start a new list on here and drop me a mail .
Not going to do the 6 led in the side of the case as its too tight to make a nice job of it but with a diferent case it might make a good un .
Trout, I'll start a new list, and have dropped you an email. I will also take a driver if Steven does another batch.
john_walker74 LEDs & Driver
Put me down for a kit as well please Trout, backed out last time but bugger it, ill give it a go.
Here's some pictures feel free to give advice on gardening... 😉
plus I'm no professional at taking pictures..hang head in shame 😳
home brew light full
[IMG]  [/IMG]
low
[IMG]  [/IMG]
[IMG]  [/IMG]
[IMG]  [/IMG]
[IMG]  [/IMG]
+20 meters
[IMG]  [/IMG]
magic shine +20 meters
[IMG]  [/IMG]
Garden looks fine .
is that a pet tomb by the gate.
looks a narrower and brighter beam than the Bastid .
whens the first ride report
Build looks good too is it bar or helmet mount
I Bet you were chuffed when it worked 😀
I'll take a kit trout. Will also take a black cat driver kit if they are made again. Was the mail to be from the list organiser or from each person?
Am crap at writing reports...mucho happy it works and can't wait to try it out this week. 
Just to add it will be more helmet but will try both
Well done Lipseal you must be well pleased, good beam shots and nice windmill too 😀
Still got a way to go, faffing & hangover have seen to that 😳 As a thought could you make a gasket out of inner tube rubber to seal the ends up with?
Oh and what size drill to use for the cable grommet that came with the trout kit, guessing 6mm?
EDIT: make that 8mm?
Stayhigh cheers, I used 6mm ( nice tight fit and the cable doesn't go all the way in had to cut it back, made it more flexable) drill and used a bit of glue around the grommet and where the cable enters plus the heat shrink just to finish it off, pity I didn't have any black that size. Has anyone got any ideas how to make the (smudges) battery pack weather proof?
Just a little tip on the cable and grommet put a zip tie on inside to give it some strength .
some old innertube and 2 zip ties work well .
or for light weight a condom 😯
Forgot to say on last reply that the connectors where from sumdge, just like the hope pop lock ones so it was a tight fit(the lions sleep tonight).
Ribbed or feather lite? 😆
Lipseal, nice job, beam shots look good as well. Just be carful, light building can become addictive.
Out of interest did you have to use any specialist tools or did you get away with the normal stuff you would expect to find in a cyclist shed.
Cheers CK, the only thing I bought was the glue off fleabay (plus the leds etc) all other bits in the garage stores. Was going to tap holes out but used self tappers as I have a good selection, so yeah all the usual stuff.
Hopefully extra strong with my fumbling fingers lol
Anyone tried this...[url= http://www.amazon.co.uk/Plastidip-Plastic-Rubber-Paint-Junior/dp/B003B3RO48/ref=sr_1_10?ie=UTF8&qid=1287346535&sr=8-10 ]CLICK[/url]..out of interest?
IIRC some people have used it for sealing bastid batteries but not used myself.
I have a big tin of the stuff and dip all the batteries I send out with a Troutelight good stuff it is .
but not cheap to just buy for one battery .
Hi Lipseal .... Point your light up in the sky southward ..... see if I can see it from Crosby!
If you're down anywhere near this way after dark ... or someplace in between, let me know ... I could compare it with my ancient halogens while I wait for Trouties next batch of Led's to come in.
Got itchy fingers here just AAA'ng ali to drivers and drilling the odd hole .... must see lumens!
Don't know when I will be able to have a go at one of these but really fancy it. I was wondering about improving heat dissipation so started Googling ally extrusions. Found this - http://www.birminghamaluminium.com/heatsinks_home.php
Just thought I'd share in case anyone is interested. You can also get simple ally radiant/heatsink from Maplin too. Thought if you used thermal paste between radiant and case and long screws through the radiant in to the internal heatsink you would get transfer up to the radiant. May be overkill but I'm Capt. Paranoid plus may add that pro look to the box.
Trout . Can i be put on the new list for a kit please. Had a go at making one before but this one seems to be alot better than my attempt.
Blackcat. i would also need a driver please (not to fussed about the other bits if you dont have them).
BH I should be able to pop down to Crosby on Thursday night, let me know if this is ok and email.
I've recompiled the possible-Round-2 list from the past few pages, its a bit confusing, dunno how trout and bct keep up. If I've missed you or you shouldn't be in it update the list and repost.
runswithscissors LED kit
bobblehat 4 * 20mm xp-g
john_walker74 LEDs & Driver
bigjim LED kit + driver kit
mau00149 led kit + driver kit
norcbot led kit + driver kit
landy813 - driver
by jingo it actually works!
just need some silicone to seal it up and stop the cones rattling (mis-aligned one of the angle mounts ever so slightly). no pics of inside as, quite frankly, my soldering is an embarrasment - but it works! i`ll post a pic of the finished article in a bit.
just need to sort the mount and i`ll be off.
it appears quite a tight beam so we'll have to reserve judgement till i've used it in anger but its 'bloody bright'(tm) - i can floodlight my pumptrack (about 100ft away at the bottom of my garden) from the balcony no problem.
big cheers to trout and BCT. jobs a goodun!
Update No.1......
runswithscissors LED kit + Driver kit
bobblehat 4 * 20mm xp-g
john_walker74 LEDs & Driver
bigjim LED kit + driver kit
mau00149 led kit + driver kit
norcbot led kit + driver kit
landy813 - driver
My 1st attempt actually works! Off to the woods to try it out tonight.
[IMG]  [/IMG]
tee hee. could cut the case down a bit and probably will at some stage but its not heavy as it is. put a tamiya connector onto BCT`s power cable but didnt use the socket - cable is fixed to the head unit so detach the battery to charge.
all made using regular tools and good old fashioned bodging. the hardest bit was getting hte angle drilled in the right place to mount it to the box as i have nothing to hold it in place as you drill through
Update No.2......
runswithscissors LED kit + Driver kit
bobblehat 4 * 20mm xp-g
john_walker74 LEDs & Driver
bigjim LED kit + driver kit
mau00149 led kit + driver kit
norcbot led kit + driver kit
landy813 - driver
Clobber LED kit + driver kit + 2*20mm xp-g (please)
[img] 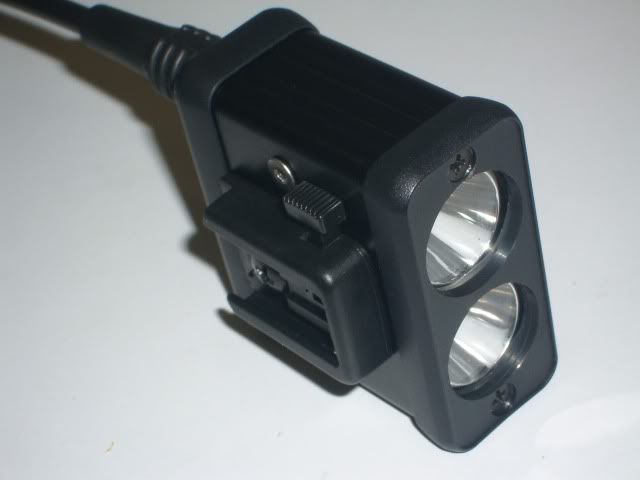 [/img]
Looking at this, one thing that comes to mind is, would it be a good idea to chamfer the edges around the front panel holes/reflector opening, as there are a good few mm of overlap which might cut some beam spread?
List update ... thanks Troutie
runswithscissors LED kit + Driver kit
bobblehat 4 * 20mm xp-g + 2 pieces of lexan please!
john_walker74 LEDs & Driver
bigjim LED kit + driver kit
mau00149 led kit + driver kit
norcbot led kit + driver kit
landy813 - driver
Clobber LED kit + driver kit + 2*20mm xp-g (please)
Looking at this, one thing that comes to mind is, would it be a good idea to chamfer the edges around the front panel holes/reflector opening, as there are a good few mm of overlap which might cut some beam spread?
Just a bit of parallax, holes are 20mm for a 19mm reflector.
Nice light VH, any ideas how you will seal battery?
List update (my original request was missed off!)
Jazid - xpg LED Kit (incl. lexan + angle) + Driver Kit (3way + 2way)
runswithscissors LED kit + Driver kit
bobblehat 4 * 20mm xp-g + 2 pieces of lexan please!
john_walker74 LEDs & Driver
bigjim LED kit + driver kit
mau00149 led kit + driver kit
norcbot led kit + driver kit
landy813 - driver
Clobber LED kit + driver kit + 2*20mm xp-g (please)
Any idea where we can source a micro pot. (as in http://forums.mtbr.com/showthread.php?p=7076204 )
not sure LS. my old solution was putting it in a waterbottle and seal the cable entry
however my new frame doesnt have a bootle mount so i`ve been taping the batt direct to the toptube. i generally dont ride if its sheeting it down so i was considering judicious use of a food bag and more tape for sealing on damp evenings
alternatively i`m sure there must be some tupperware in the world that is the right size! not very pro i know but then its dark when you use it!.
Good stuff fellas hopefully be a few more working ones along soon .
Thanks for updating the list too .
Just been making a jig to drill the stars so they may come predrilled for the reflector depending on spare time available .
I'd like a kit too please but just wanted to check what kit I actaully need - I want to make the whole light - it take it thats the led kit and driver kit?
Damo's (missing) update to the list
Jazid - xpg LED Kit (incl. lexan + angle) + Driver Kit (3way + 2way)
runswithscissors LED kit + Driver kit
bobblehat 4 * 20mm xp-g + 2 pieces of lexan please!
john_walker74 LEDs & Driver
bigjim LED kit + driver kit
mau00149 led kit + driver kit
norcbot led kit + driver kit
landy813 - driver
Clobber LED kit + driver kit + 2*20mm xp-g (please)
Damo2576 - LED & Driver Kit)
Damo2576, this thread is now over 500 posts long and there is a lot of detail, however very rougly you'll also need;
A Hammond metal case (from maplins http://www.maplin.co.uk/Module.aspx?ModuleNo=33690 .e.g. N82AL) - Trout's L angle ali strip is cut for this case.
Battery pack (e.g. 8xAA battery holder e.g. RK44X + 8 rechargable AA's)
Thermal conductive compund for transferring heat away from LED ( e.g.Artic Silver or own homemade epoxy)
Various 2/3/4mm self tapping screws (the ali case is soft enough for self tappers or make your own thread with a tap/die set)
Fibre washers to place between the screw head and led
A Hammond metal case (from maplins http://www.maplin.co.uk/Module.aspx?ModuleNo=33690 .e.g. N82AL) -
wonder if the plastic or alu ended version is easier?
the metal ended one you dont need to cut for the lexan/perspex as you use the metal plate as a guide and replace it.
the plastic ended you'll need to cut holes as per CK's light. i didn't have the kit to do this nicely so went for the metal plate option. it doesnt look as smart but its about what you have the tools to do.
Another Update:
Jazid - xpg LED Kit (incl. lexan + angle) + Driver Kit (3way + 2way)
runswithscissors LED kit + Driver kit
bobblehat 4 * 20mm xp-g + 2 pieces of lexan please!
john_walker74 LEDs & Driver
bigjim LED kit + driver kit
mau00149 led kit + driver kit
norcbot led kit + driver kit
landy813 - driver
Clobber, 4xLED kit + 4xDriver kit + 2*20mm xp-g (these are for friends so I'll make sure there is a profit for you Troutie!)
Damo2576 - LED & Driver Kit)
I think I'll add a bit extra so trout and bct are at least getting some money for their time, we must be a right pain in the proverbials...